
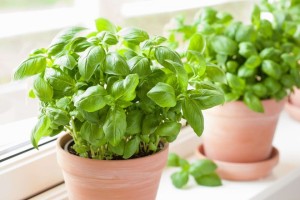
Basil is a herb that is always on the list of essential herbs for seasoning dishes. Like other herbs, basil can be easily grown in any area, even at home, in small pots on the balcony, or in containers outside. Especially, if you are a home cook passionate about "gardening" and have a project to create an "herb garden" at home, basil is a must-have.
To grow some basil plants for yourself, there are many ways to do it. Most people choose to buy seedlings or try taking cuttings from basil at a neighbor's house, etc. It depends on how much time you have for them and if you are a patient person who enjoys the moments of caring for plants, you can propagate basil by taking cuttings.
>>>Read More: How to plant onions that have sprouted in your pantry
The answer is definitely yes; basil can be grown by taking cuttings. This process is also known as basil propagation. Simple propagation means creating a basil plant by dividing, taking cuttings, etc.
Some plants are difficult to propagate, but if cared for properly, basil propagation can definitely be achieved. Obviously, propagating basil from cuttings will take more time, but the result of growing multiple plants from basil cuttings can be an interesting experience.
To propagate basil from cuttings, you will need the following materials:
Small pot (or a container with a radius of about 3cm, and importantly, ensure the pot has good drainage) or a planting area with some potting soil.
Water
Rooting hormone (optional, depending on your preference)
Step 1: Choose Cuttings
To start, you will need some basil cuttings. If you are growing basil yourself, simply cut some healthy basil stems that are not flowering. You don’t need to cut the entire stem; just select stems about 10-15 cm long and cut them to use as cuttings.
If you are not currently growing basil and don’t know anyone who is willing to share cuttings, you can go to plant shops, supermarkets, or farmers' markets to buy fresh bunches of basil. Although cutting stems directly from the plant is certainly preferable, some fresh basil cuttings purchased will also work well.
Step 2: Prepare the Cuttings
Once you have a suitable basil stem for propagating, strip off the leaves from the lower part of the stem. You need at least a 5 cm section of bare stem to form roots later. Next, cut the end of the stem at a 45-degree angle. The plant is now ready for propagation, but if you don’t have time to continue immediately, you can store the cuttings in the refrigerator, wrapped in a plastic bag.
Step 3: Dip the Stem in Rooting Hormone
At this point, you have the option to dip the bare stem in a rooting hormone to stimulate better growth. However, this step is not mandatory; you can skip it if you wish.
If you choose to use rooting hormone to help the plant root faster and healthier, you can purchase it in powder or gel form. Then, simply dip your stem in a little water and then into the rooting hormone.
Step 4: Encourage Rooting Before Planting in Soil
If you choose to start planting with rooting hormone, you can plant the stem in a potting mix to ensure good drainage. Since these are just small cuttings at this stage, planting them in a small bag or pot is more appropriate.
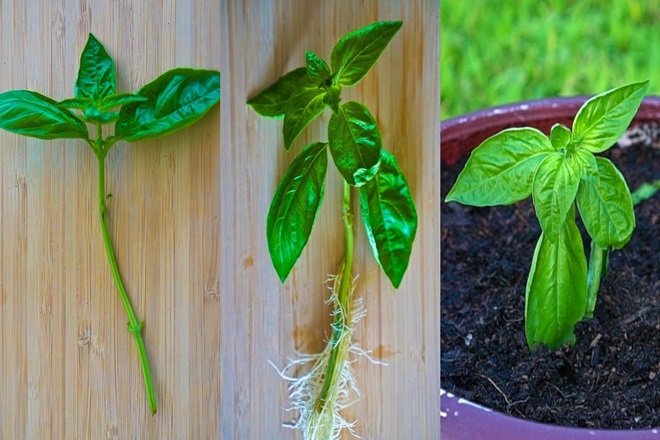
If you are not using rooting hormone, you will need to encourage the stem to root before planting it in soil. To do this, you can place the basil stem in a glass of water, with the 5 cm bare stem submerged. After 3-4 weeks, you will start to see roots growing from the stem! When you have a good amount of roots developed, the plant is ready to be planted in soil!
Step 5: Plant the Basil Cuttings in Soil
The next step in propagating basil cuttings is to plant them in soil and wait for the plant to grow. Depending on when you propagate, the time for the plant to root and grow will vary. Typically, after 6-8 weeks, you will begin to see growth signs.
It is best to keep the basil in a warm and humid environment. If you have a greenhouse, that’s a perfect environment! If not, you can place a plastic bag over the plant and the container, which will have a similar effect. Depending on the outdoor climate you are growing in, this may not be necessary.
If you notice leaves starting to turn yellow after a few weeks, it could be due to transplant shock. In this case, just remove the yellow leaves and keep monitoring; the plant should grow well!
Step 6: Care and Harvesting of Basil
Now that you have started growing the plant, it’s time to start caring for it just like you would for any basil seedlings. Ensure the basil gets enough sunlight and is watered adequately to grow well. Finally, you can harvest the leaves for Italian dishes, Mediterranean cuisine, or other recipes, and you can also transfer the basil plant to the garden for long-term growing.
In summary, basil is a wonderful herb to try propagating from cuttings! To propagate basil, you can follow the steps for basil cuttings as Veque has outlined. Although it may seem more time-consuming than buying from the market or supermarket, just imagine how wonderful and impressive your small self-sufficient garden will be once completed, and how many people will admire it.
Ý kiến bạn đọc
Những tin mới hơn
Những tin cũ hơn
 The most unique carrots in the world!
05.09.2024
 Guide to Propagating Basil Cuttings for Beginners
30.08.2024
 How to take care of basil plant indoors for Beginners
30.08.2024
 Interesting Facts About Ants
23.08.2024
 Coucal bird: Natural Enemy of Snakes
22.08.2024